

How Do You Cut A Wig For Beginners?
When you get a new wig, no matter how it is a human hair wig or synthetic wig, you can cut the wig as you want to make it look more natural. For instance, you could cut the wig to a shorter length, add layers, or create bangs for a different look. You can always hit up your favorite stylist for customizations, but that’s not the only option, there are a few simple ways to cut and style your wig at your own home.
Can You Cut A Wig?
Yes, it is completely possible to trim a human hair wig by yourself. There are several benefits to cutting a lace front wig:
1. Get A More Natural Look
You can cut and style a wig to own a flawless natural hairline, thus getting a more realistic look.
2. Create A More Flattering Style
Bangs are super fun and can completely change your look, and add a lot of style to your look. If your wig already has bangs, you can trim it to make it better suit your face. You can also easily add bangs to a hairpiece that does not have a fringe. In a word, you can create a style that perfectly complements your face shape for the most flattering look possible.
3. Remove Damage
As we all know, wigs will be damaged with wear, blow-dry, and styling over time. When the ends of your wig begin to split or break, a simple trim can make your wig look new again.
How To Cut A Wig To Make It Shorter
Turning your long wig into a cute short hairstyle is not difficult as you think. Now take a look at how to cut a long wig into a short bob wig.
Step 1 Hold Wig In Place On A Wig Stand
First of all, place your wig on a wig stand and use some pins to secure the wig to the stand.
Notice: Don’t forget to check whether the wig stand is straight or not. If it’s at an angle, you can get an accidental asymmetrical haircut!
Step 2 Remove Any Tangles
Take a wide-toothed comb to spend a few minutes gently brushing out your wig to remove any tangles. Of course, you can use a detangling spray to detangle any knots. And smooth out the hair prior to cutting to ensure a smooth trim.
Step 3 Cut The Back Of The Wig
Start with the back of the wig, work in small sections, and move your fingers down the hair until they are at the length where you want to wig to be.
Then try to hold the hair so that it’s flat between your middle and index fingers, rather than bunched together.
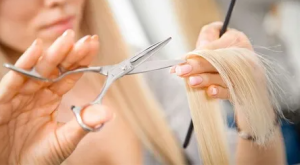
The next step is to use your scissors to trim hair across the entire length of your fingers at a 45-degree angle, which not only will remove some of the “heaviness” at the bottom of the wig, but it will ultimately create a more natural appearance.
If you want to make a drastic change and go from long hair to medium-length or short hair, just adjust where you’re going to make the cuts to get the length you desire.
Step 4 Trim The Entirety Of Wig
Repeat the above step until all the ends are the same length. When moving on to a new section, use some of the hair from an already-cut area to guide the trimming, which can make sure all hair ends up being the same length.
In the end, walk all around the wig, and snip off the ends for any long, scraggly hairs you might have missed in the trimming process. Also, check the length of the hairs on either side of the wig to make sure they are even.
How To Trim Layers On A Wig
Layered hair is always among the most favorable hairstyles that girls are crazy for. If you want to bring in layers and texture, it’s time to grab your thinning shears and get to work. So how to cut a wig into layers? Below is the step-by-step guide that we would love to share with you.
Step 1 Hold Wig In Place On A Wig Stand
First of all, place your wig on a wig stand and use some pins to secure the wig to the stand. It will also give you a more evenly layered style than trying to cut with the wig on your head.
Notice: Don’t forget to check whether the wig stand is straight or not. If it’s at an angle, you can get an accidental asymmetrical haircut!
Step 2 Remove Excess Knots
Use a spray bottle to wet the hair and comb it out with a wide-toothed brush to remove any tangles.
Step 3 Hold The Front Hair Back
Gather the front hair of the wig into your hands and use hair clips to secure it in front of where the ears would be to ensure it doesn’t accidentally get cut while you’re layering the other hair sections.
Although you’ll layer the front sections, too, it’s easier to start with the back and finish with the front since the back is the area that normally needs the most work.
Step 4 Determine The Layer Position
Where do you want your layers? Continue split the layers of your wig, leave the bottom layer of the wig in place and decide how long the layers and the length of the hair layers you want.
Step 5 Secure The Top Section
Clip the top hair section and hold your top hair section stay far away from the rest of the hair on the wig so that you can work on the bottom and middle sections.
Step 6 Trim The Middle Section
Hold small sections of hair between your middle and index fingers, and Position your middle and index fingers at the length you want the first layer to be. Next, cut upwards at a 45-degree angle toward your fingers and cut sections that are 2 to 3 inches across at a time until they get your desired length.
Step 7 Layer The Top And Middle Hair Section
Similar to how you layered the back sections of the hair, cut the middle and then the top portions of the front of the wig, but cut at a downward angle rather than straight across.
Remember to section off the top portion as you work on the middle, and then end by layering the top. Also, remember to cut the front layers at a downward angle and keep your elbow up to help control your hand in the right direction, so that the hair will lay nicely with that front outline you created.

